Showing posts with label Home Depot. Show all posts

Saturday, April 14, 2018

It's Flag Season...Again.


I'm still standing by what I said in a post last year...


When it comes to decorating, there's only three seasons: Fall, Christmas, and Flag Season.


Basically, I love putting small flags in anything that stands still. As you can see in the picture above, adding dried beans to a canning jar helps to keep the flags standing up. 

I've found the best place to buy these small American flags is Home Depot. I usually find them there for 99 cents each. Lowe's carries the little flags too, but their price is a little higher. Yep, I'm lazy and cheap!

Right now I'm breaking out last year's flags to get started. I have to confess, it takes me a while to get it done when it comes to decorating. So once decor is up, I like to leave it a while. How about you?


Flags In The Pots Last Year

If you're a fellow lazy decorator, flags work - inside and outside -the whole month of May (building up to Memorial Day) then stay around for the 4th of July, and through the summer and on to Labor Day! 

That's why I'm repeating here what I said in this POST last year, except for Christmas and fall, all the rest of the year can be Flag Season.
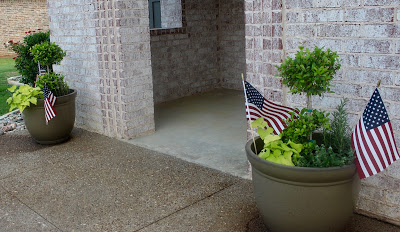
In The Heat Of Summer When Flowers Die, Flags Can Add Color

Just let your little flags fly and add flowers, chickens, candles... whatever hits your fancy.


Thanks for dropping by!


Sharing Here:
Sundays At Home Link Party


Saturday, August 20, 2016

Another Episode Of The Mudroom Closet Saga


Another part of the "mudroom-closet" project at middle daughter Jaysa's house is complete. I'd like to think we're near the end of this never-ending saga, but I know that's not true.
Middle daughter is developing the disease I suffer from called "Let's Complicate The Hell Out Of It."  

Let me state right here, for the record, that no one paid me to advertise the products we used nor the stores at which we bought them. 

And, to be honest, we are at best the roughest DIYers around. I suggest you use us for inspiration, but find a good - and that means competent - tutorial somewhere else on the net!
Luckily for Jaysa, her DIY construction skills are getting pretty good, her power-tool collection is growing, and (last but definitely NOT least) little Livvie is 3 and 1/2 now and not so "helpful" as she once was. Here's Livvie back in Dec 2014 standing on the old temporary bench helping... 
All this means Jaysa (using her husband Mike as her spotter) can do more project jobs herself without us. We live quite a ways apart and it's a long wait between visits. Here's where we left Jaysa and the closet on January 1st this year...
If you want to catch up, you can see the post on the original project (shelf and hooks) here, and the built-in bench project here.

Fast forward to present. A couple weeks ago, Jaysa and I set out to paint the bench, and the bottom wall of the closet, white (Behr's Swiss Coffee) to match the boards that the hooks are on. We put the first coat of primer on the wall...we paused.
Someone thought it needed a sturdier look. Maybe we all thought it needed a sturdier look. Off to Lowe's and Home Depot we went to buy a little electric saw and some boards and/or panels. The "we" included Wild Bill as our somewhat grumpy technical adviser. He was really resistant to the little Dremel Saw I had in mind.
We came home with the Dremel saw and a package of short boards with "V-Grooves" that link together. 
 When linked together, the joined boards look like this...
This is what one section looks like before joining it with other boards. Each section appears as two thin boards...
A TRUE GENIUS figured out that DIYers need packages of light-weight boards and an easy way to put them up! My kuddos go to Home Depot for carrying this product. (More about this product in another post.)
Jaysa grabbed 6-year-old Ben's water googles to make me laugh, then she pulled out her safety glasses to reassure Wild Bill no safety rules would be broken on his watch.
Since it was a small job, we improvised our cutting station by using two IKEA step stools that were handy. That saved us another trip to the store to get saw horses.
The Dremel saw only operates if the trigger is being held. It's the perfect cutting tool for a lady DIYer. As you can see, Jaysa could hold it easily in one hand when not cutting. 

Our technical adviser swallowed his pride and admitted the Dremel was a pretty good little tool. He even ordered me one from Amazon when we got home from our road trip!
This is a somewhat messy picture of the kitchen looking into the mud room area. I didn't crop it because I wanted to give you an idea of how the mud room relates to the house. Squint and you won't even see our coke and water bottles on the counters.

I hope you'll come back for my next post to see the finished bench area all painted up after two coats of primer and two or three coats of paint. 


Thanks for dropping by!

Linking to:


Wednesday, July 29, 2015

Making The Baskets Roll


 Last post, I bravely showed you the mess
I have in my office nook.

I decided to replace the ugly plastic tubs
under the desk in the corner with my
favorite large baskets from Target. 

Trouble is, the stuff  I keep under the desk
area tends to be heavy, mostly books and
projects waiting for some attention.
I didn't want the heavy baskets to scratch
up the wood floors.

My plan was to use cheap wood to build a
rolling platform for three baskets. The baskets
measure 15x18 each. I wanted the platforms
to be the same size as the basket bottoms.
 
The cheapest wood was plywood. The best
sized one I could find was 24x48 for $16.95
at Home Depot. It was 3/4 inch thick.

The friendly man in the wood department cut
it down to an 18 inch length and 45 inch width.
Then he cut the width into three, 15 inch pieces.
No charge for the cutting.

 I also bought 12 small rollers that turn

 around 360 degrees. Each roller was $2.65
Yeah...if you're keeping track, my cheap
platforms were starting to get out of hand!


With a package of flathead wood screws  (each
wheel takes four screws) the final talley was
about $63 to make the three platforms.

 That really hurt!

 The good thing is the wheels are always re-usable.

I may stain the platforms at a later date.
For now, I'm using them the way they are. 
I have an office to clean out, remember?

I do have a few scraps of plywood left over that I
plan to use for another project. The bad news is I
have 3 more baskets that could use platforms too.

Thanks for dropping by! 


At the party here:
Dwellings