Tuesday, August 30, 2016

On Decisions, Dilemmas And Cliches


How do you make decisions? Are you able to do it quickly or do you struggle?

I once read when you are faced with a decision of your life path, you should only ask "yes" or "no" questions. 
Meaning that if you turn to the option of making a "Pro's" and "Con's" list, you can really get yourself side-tracked.
I know this isn't a "life path" decision, but to sell -- or not to sell --these counter stools has been taking up a lot of my mental energy.
In fact, I was shocked to find that I've been struggling with this stool decision for 3 years! 

In July 2013, when Restoration Hardware shipped these stools to us and they were not what I expected, I did a post. In that post here, I had only unpacked one of the stools and was wanting to ship them back. Well...I should have. Instead I pro'd and con'd myself into keeping them.

Lesson learned here is follow your first instincts. The stools are not comfortable and the feet caps are too shiny. The seats are stained black, not stained wood like the picture in the catalog or on-line makes them look. 

Forgive me, but here's yet another cliche I've know for a long time, but have ignored:  You Have To Make The Right Decision Or Make The Decision Right.

Before I read Marie Kondo's book, The Life Changing Magic Of Tidying Up, I would've just hid them in the garage. But instead I'm finally making the decision right by facing up to the fact these stools will never work for us.

Three stools going on Craigslist today! And then I'm getting over being mad at myself for buying them in the first place. No pro's or con's about it.


Thanks for dropping by!


Thursday, August 25, 2016

Almost Happy Fall


We were down in McKinney the other day...or maybe it was the other week? Time really flies when you're getting older. 
I know it would be easy to make this Happy Fall banner by myself, but my interests lay more in victimizing my furniture than in being crafty.  Besides, the price ($9) made it too good to pass up. Last November, I bought my Christmas banner at the same place. 
I saved the label to share the name and address of the booth and website with you. 


I'm getting my other Fall decorations out to find something to hang in the center of the banner to fill up the separation between the "y" and the "f". Nothing big or fancy. Just something like a leaf or an acorn is what I have in mind.
Is Fall coming too fast or too slow for you this year? Or are you like my father-in-law who only calls it Football Season and wishes it would never end?


Thanks for dropping by!


Join Me Here:
Dishing It And Digging It Link Party


Monday, August 22, 2016

Entryway Ideas On Limited Budget


While visiting in Illinois earlier this month, middle daughter (Jaysa) and I stopped by a Crate and Barrel store and spied this bench. 
We had just started working on Jaysa's built-in-bench project again and wanted to keep this bench in mind to inspire us for that project, as well as a future project of my own.  

For a long time, I've been dreaming of adding a bench and wall trim to our own entryway. Except my dream is larger, whiter, and has to be a whole lot cheaper than the over $2000 price tag this Crate and Barrel bench carried.

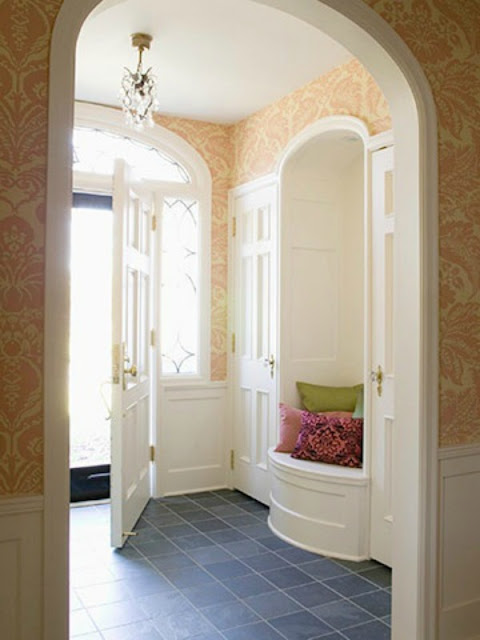
To give you an idea of what I'm obsessed dreaming about, here's two pictures I've been carrying for a while. These entryways are far grander than what I'm planning to do someday, but they do make me drool.
Source Unknown

Not sure where I got these pictures, but they look like they're from a professional or magazine source. If you know the source, please let me know and I'll give them the credit they deserve.
Source Unknown

When we got home from our trip, one of the first things I did was to buy this package of pine bead boards to help me figure out how to create a taller and whiter version of the Crate and Barrel bench.
These boards are tongue and groove bead board. The package says it will cover almost 9.8 square feet. Our local Home Depot carries quite a selection of sizes in varying heights. The boards in this package are 31 and 3/4 inch long.
Each tongue locks into the groove of the next board. Here's a close up of the left (tongue) side.
Here's a close up of the right (grooved) side. The boards fit together by locking and it just takes a small nail to hold them in place.
We used a similar package doing Jaysa's bench in my last post, but it wasn't bead board like this one. It also had a white finish and wasn't wood, but a wood product.

I can't wait to show you Jaysa's finished built-in bench, but she's just now putting on the last coats of paint. I'm trying to be patient as I know paint has to dry well between coats. That, and the fact that she has a lot to do in her busy life than paint. 


Thanks for dropping by!


Let's Party Here:
Amaze Me Monday


Saturday, August 20, 2016

Another Episode Of The Mudroom Closet Saga


Another part of the "mudroom-closet" project at middle daughter Jaysa's house is complete. I'd like to think we're near the end of this never-ending saga, but I know that's not true.
Middle daughter is developing the disease I suffer from called "Let's Complicate The Hell Out Of It."  

Let me state right here, for the record, that no one paid me to advertise the products we used nor the stores at which we bought them. 

And, to be honest, we are at best the roughest DIYers around. I suggest you use us for inspiration, but find a good - and that means competent - tutorial somewhere else on the net!
Luckily for Jaysa, her DIY construction skills are getting pretty good, her power-tool collection is growing, and (last but definitely NOT least) little Livvie is 3 and 1/2 now and not so "helpful" as she once was. Here's Livvie back in Dec 2014 standing on the old temporary bench helping... 
All this means Jaysa (using her husband Mike as her spotter) can do more project jobs herself without us. We live quite a ways apart and it's a long wait between visits. Here's where we left Jaysa and the closet on January 1st this year...
If you want to catch up, you can see the post on the original project (shelf and hooks) here, and the built-in bench project here.

Fast forward to present. A couple weeks ago, Jaysa and I set out to paint the bench, and the bottom wall of the closet, white (Behr's Swiss Coffee) to match the boards that the hooks are on. We put the first coat of primer on the wall...we paused.
Someone thought it needed a sturdier look. Maybe we all thought it needed a sturdier look. Off to Lowe's and Home Depot we went to buy a little electric saw and some boards and/or panels. The "we" included Wild Bill as our somewhat grumpy technical adviser. He was really resistant to the little Dremel Saw I had in mind.
We came home with the Dremel saw and a package of short boards with "V-Grooves" that link together. 
 When linked together, the joined boards look like this...
This is what one section looks like before joining it with other boards. Each section appears as two thin boards...
A TRUE GENIUS figured out that DIYers need packages of light-weight boards and an easy way to put them up! My kuddos go to Home Depot for carrying this product. (More about this product in another post.)
Jaysa grabbed 6-year-old Ben's water googles to make me laugh, then she pulled out her safety glasses to reassure Wild Bill no safety rules would be broken on his watch.
Since it was a small job, we improvised our cutting station by using two IKEA step stools that were handy. That saved us another trip to the store to get saw horses.
The Dremel saw only operates if the trigger is being held. It's the perfect cutting tool for a lady DIYer. As you can see, Jaysa could hold it easily in one hand when not cutting. 

Our technical adviser swallowed his pride and admitted the Dremel was a pretty good little tool. He even ordered me one from Amazon when we got home from our road trip!
This is a somewhat messy picture of the kitchen looking into the mud room area. I didn't crop it because I wanted to give you an idea of how the mud room relates to the house. Squint and you won't even see our coke and water bottles on the counters.

I hope you'll come back for my next post to see the finished bench area all painted up after two coats of primer and two or three coats of paint. 


Thanks for dropping by!

Linking to:


Wednesday, August 17, 2016

A Month Without Dee


Sweet Dee
Said Goodbye
July 17, 2016

Always there for kisses...
Always there to cuddle when I visited...
Always there to party...
 Always there to greet her brother and sister...
 Always there to make sure they weren't lonely...


Always there to say hello and goodbye...
Among my favorite stories of her is the one where
Dee got kicked out of Doggie Day Care because
she insisted on jumping the half wall to greet the
other parents coming to pick up their dogs.

Her Grampy and I visited her parents and siblings
 the first week of August. 

For the first time since her adoption in 2006,
she wasn't there.

It felt a little like Elvis had left the building. 


Sunday, August 7, 2016

Kitchen Klutter


The goal is to add blue to the house this month. Blue is suppose to make things seem cooler right? August in Texas = Hot as hell!
The kitchen isn't that large, but I like to put a cabinet in the middle of it so I can keep the counters clear. Things tend to pile up in the kitchen, so it's a constant give and take.
I used Ce Ce Caldwell's chalk & clay paint in Smoky Mountain Gray to paint some things for the kitchen a while back. Although it's called gray, it is turns out blue. Go Figure! 

Here's the little trinket box in its original state. I never did distress and dark wax it (the step I like the least) but I do plan to. 
Need to "Get Round To It" sometime soon. Everything looks better with chalk paint and a little dark wax! It still amazes me the endless number of things you can paint if you have a mind to...
Here's the first coat of chalk paint on this shiny metal tub. The first coat is always the moment where you say "What Did I Do???"

 And here's the difference chalk paint can make...

If you have something you like, but it's the wrong color, give chalk paint a try. It doesn't matter which brand you use, just pick one in a color you like and paint something. 


Thanks for dropping by!


Monday, August 1, 2016

Romantic Homes Magazine Projects


Romantic Homes Magazine is sometimes hit or miss. The latest edition, the August 2016 issue, is one of those hits! So many great ideas in here.
Two distressed projects in the magazine immediately caught my eye because of how heavily distressed they are. I already have old projects that are similar, I guess I just need to distress the heck out of mine. 
The chalkboard I showed two weeks ago, for Five on Friday, just needs some heavy distressing and it could easily hold the hanging jar with flowers as the magazine's chalkboard above does.
And when I saw this picture of a heavily distressed wood plaque with a large hook, I thought of a similar one I made last year.
Back then I used an old outdated picture and a deer hook to make a this project for my laundry room to hold my hangers. Sorry for the shadows.  It hangs in the laundry room with very little natural light so the overhead light had to be on.
Here's the original wooden picture that I used to make the hanger. Obviously not my style in its original state. I bought it a few years ago at a garage sale for $1.00 just for this type of project.
As usual, I didn't receive any money for my opinion. In fact, I let my subscription to Romantic Homes expire two months ago so I had to pay full price for this issue. But I was happy to buy it as I truly loved almost every page.


Thanks for dropping by!